
Windows SmartScreen is a security feature in Windows 10 that helps protect your device and personal information from phishing scams and malicious software downloads. It analyzes downloads and website connections to see if they seem suspicious or unsafe. If it detects a potential threat, you’ll see a warning message that says “Windows protected your PC”.
While SmartScreen provides an extra layer of security, some users find the warnings annoying or too sensitive. The good news is you can turn SmartScreen warnings off completely or adjust the level of protection to be less strict.
What Does the “Windows Protected your PC” Message Mean?
When you try to download an app or file from the internet, SmartScreen checks it against a Microsoft database of known good and bad files. If it’s a known or suspected malicious file, you’ll get a warning:
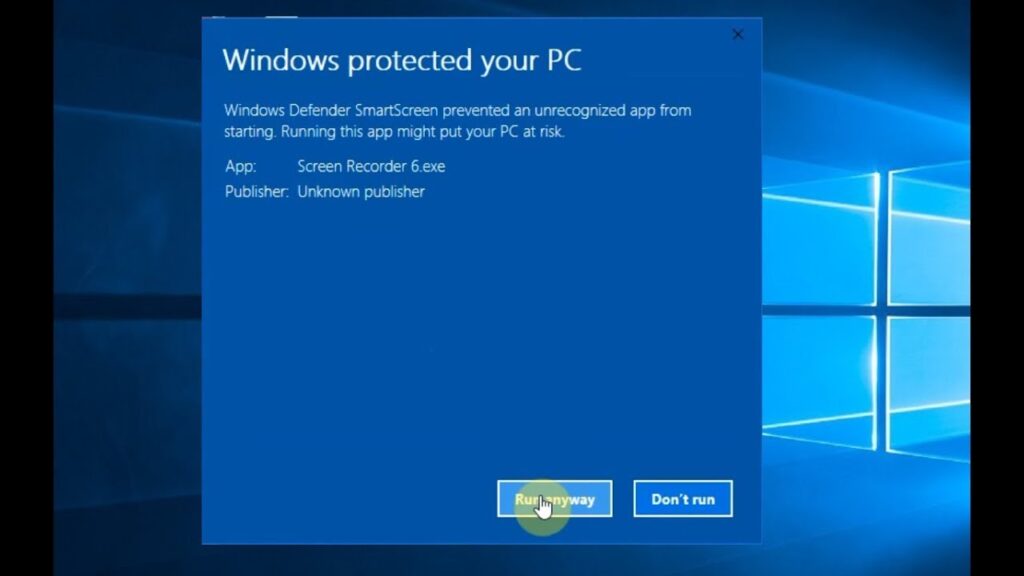
“Windows protected your PC – Windows SmartScreen prevented an unrecognized app from starting. Running this app might put your PC at risk.”
This means SmartScreen analyzed the file’s reputation and believes it looks suspicious or could potentially harm your device.
You may also see a similar SmartScreen warning when connecting to certain websites:
“Windows protected your PC – Windows SmartScreen prevented an unverified app from starting. App verification helps protect you against viruses and other malicious software.”
This indicates the website triggers SmartScreen’s suspicious website checks, which compare the URL to known phishing/malware sites.
So in short, the “Windows protected your PC” message means that SmartScreen blocked an app download or website connection it deemed potentially unsafe. But you have options if you actually trust the download source.
How to Turn Off SmartScreen Warnings
If you find the SmartScreen warnings excessive or want to turn the feature off completely, here are a few methods:
Turn Off SmartScreen for Apps & Files
To disable SmartScreen for app/file downloads:
-
Open the Start menu and click the Settings gear icon to open Windows Settings
-
Click on Update & Security
-
Click Windows Security on the left pane
-
Click App & browser control under Protection areas
-
Under Reputation-based protection settings, switch Check apps and files to the Off position
-
Confirm in the pop-up that you want to turn off the SmartScreen app/file checking feature
With SmartScreen app checking disabled, you’ll no longer get warnings when downloading untrusted or suspicious files from the internet.
Turn Off SmartScreen for Websites
To disable SmartScreen warnings for website connections:
-
Go back to the Windows Security screen
-
Click Reputation-based protection settings as before
-
Switch Check for unwanted and malicious software to the Off position
-
Confirm you want to disable SmartScreen’s website checking
Now you won’t get alerts when connecting to sites with suspicious or malicious reputations.
Note: Turning off both App/File and Website reputation checking essentially disables the main SmartScreen protections.
Adjust SmartScreen Sensitivity Instead of Disabling
Instead of completely disabling SmartScreen, you can adjust its strictness by:
- Going to Windows Security > App & browser control as before
- Under Reputation-based protection settings, click Manage Provider Policy
- Choose between:
- Warn: Default level. Get warnings if apps/files seem suspicious
- Block: Block potentially dangerous downloads automatically
- Off: Disable reputation checking
So if you find SmartScreen too sensitive, set it to Warn instead of fully Off.
Silently Override SmartScreen Warnings
When you get a SmartScreen warning, there is an option to ignore it and run the app anyway.
To allow a SmartScreen-blocked app to run once:
-
Click More info on the SmartScreen warning
-
Click Run anyway
Use this method to allow a specific download despite the SmartScreen warning. This doesn’t disable SmartScreen itself.
Why You Should Be Careful Disabling SmartScreen
There are legitimate reasons you may want to disable Windows SmartScreen – such as finding its warnings annoying or too sensitive. Still, it’s suggested to leave SmartScreen enabled because:
- SmartScreen provides an important extra security layer against malicious files, apps, and phishing sites.
- It has relatively low performance impact and works automatically in the background.
- Fully disabling protection features weakens your device’s security posture.
If you do disable SmartScreen, you should be especially careful and attentive when browsing the web and downloading files. Stick to trustworthy, reputable sources as much as possible to avoid malware.
You can also use dedicated anti-virus/internet security software as alternative protection that may be less strict than SmartScreen.
Troubleshooting Problems with SmartScreen
Sometimes SmartScreen blocks legitimate apps and downloads accidentally. Or you may change some Windows settings and suddenly get bombarded with SmartScreen warnings.
Here are some troubleshooting tips for common SmartScreen issues:
SmartScreen Blocks Legitimate Files
If SmartScreen flags a valid, trustworthy app as suspicious, here are some things to try:
- Verify the download comes from an official, reputable source (the vendor’s website). Avoid third party sites.
- Check if the app publisher has signed the software properly with a code signing certificate. Invalid certificates sometimes trigger SmartScreen.
- Submit the file to Microsoft for analysis at smartscreen.microsoft.com. If it’s not actually malicious, they will add it to the SmartScreen approved list.
- Use the More info -> Run anyway override option to allow the app to run just once despite the warning.
Can’t Override SmartScreen Warnings
If the option to override SmartScreen warnings is missing or grayed out:
- Make sure you are logged into an Administrator account. Standard user accounts can’t bypass SmartScreen.
- Check that SmartScreen is actually enabled. If you fully disabled it already, no warnings will show at all.
- On Windows 11, open File Explorer, click the View tab and make sure Hidden items is enabled to show all interface elements.
Suddenly Getting Constant SmartScreen Warnings
If SmartScreen suddenly starts warning about every app and website, even familiar ones:
- Run a full antivirus scan to check for malware that may be altering SmartScreen settings or network traffic analysis.
- Check for recently installed accessibility apps, parental controls, or privacy settings that may enforce SmartScreen checks more strictly.
- Restore Windows Firewall and internet security software to default settings in case of misconfiguration issues.
- As a last resort, use the steps earlier to adjust SmartScreen strictness, turn off website checking, or disable it completely.
Conclusion
Windows SmartScreen aims to provide another line of defense against malicious downloads and phishing sites by analyzing app reputations online. But its warnings can sometimes feel overbearing or get in the way.
Fortunately you have options like:
- Disabling SmartScreen app/file checking
- Turning off SmartScreen website reputation analysis
- Adjusting SmartScreen sensitivity to only warn (not block threats)
- Using the “Run Anyway” override option for individual files
Just be aware that fully disabling security protections leaves your device more vulnerable to threats. Make sure to use trustworthy sources, run antivirus scans, and exercise caution when disabling features like SmartScreen.
With the methods outlined in this guide, you can configure SmartScreen warnings to your preferences or troubleshoot issues with legitimate apps getting blocked accidentally.

 on Windows 10&s=100&p[url]=https%3A%2F%2Ffixwinerror.com%2Fhow-to-turn-off-windows-protected-your-pc%2F&p[images][0]=https%3A%2F%2Ffixwinerror.com%2Fwp-content%2Fuploads%2F2024%2F02%2FHow-to-Turn-Off-Windows-protected-your-PC-Windows-SmartScreen-on-Windows-10.jpg&p[title]=How to Turn Off “Windows protected your PC” (Windows SmartScreen) on Windows 10)
 on Windows 10)